Let's put aside for a bit our Windows machines and install Freenas. Freenas manages the shared disk that the cluster will use to host SQL's DBs.
You need to create a new virtual machine for it and mount the iso you downloaded earlier

In the next menu, as guest OS choose Other/Freebsd 64-bit

Assign 1 GB of RAM to the machine

Regarding network configuration, we don't really care about it at this point. If you select NAT, the first time the machine boots it will get an ip address through DHCP, otherwise the DHCP requests will time out but you will be able to configure the machine through Vmware's console connection. In any case, we will put it later into the correct virtual network and assign the correct IP address to it. In my case, I set it to use host-only networking

We will assign a disk size of 2GB. This disk will be used for the Freenas OS, we will need additional disks for storage. They will be added at a later point.

Before finishing the setup process, we will have the chance to change virtual network in which to put the NIC and put it in the cluster internal network.

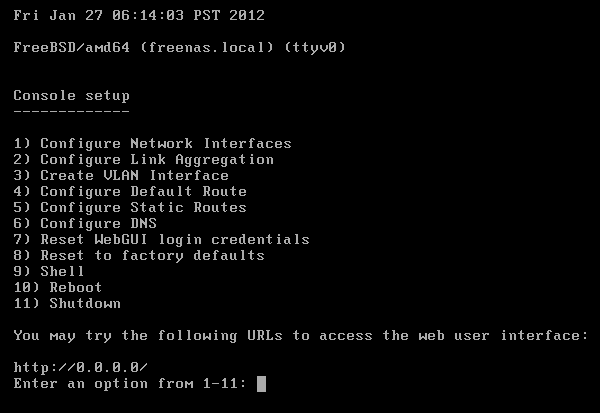
When you boot the machine and reach this screen don't do anything, it will automatically boot the default option, which is fine

To install Freenas, choose the first option

Right now we have only a disk connected to this machine and we will install Freenas on that one

We will receive a warning that we can safely ignore

When the installation process finishes, you will get this message. I suggest you shutdown and then remove the CDROM. I had all sort of interesting errors when I tried to do it the way that this message seems to suggest or rebooted with the cd still in.

As I was saying earlier, when you reboot, the OS will try to get an ip from DHCP, so it will take a bit before you get to the configuration menu. Here you can set up the network interface, which is the only thing we care at this point.
Here you can see all the options I chose to configure the IP. After that you will be able to reach the LMI through the address http://10.1.1.3 from one of the 2 cluster machines

The welcome from the LMI, by default there is no password authentication enabled.

At this point we will go back the virtual machine settings and add 2 additional disks to it. You don't need to shutdown the machine to do so, just head over to settings and add two SCSI disks, a small 4GB one and a bigger where you will install your DBs. I'll make mine 10GB.

If you go back to the console connection, you will notice that Freenas will automatically detect the change. You can see here my two disks, called da1 (4Gb) and da2 (10gb).

Let's go back to the LMI and click on the Storage button on the ribbon at the top of the LMI. This will open this tab where we will create two volumes, one called quorum and one called storage.

The quorum volume is used by the cluster for internal operations. Details are cloudy and complicated. The only things you need to know is that it cannot be used as shared storage and that it does not need to be very big. Click on the Create Volume button and choose these options for the two disks.


Here is how the storage tab will look after you created the two volumes. You can notice that Freenas reserves 2GB of space on each volume for its management.

Now that we created our the volumes that will be used by the cluster, we need to configure Freenas so that it knows how the cluster members will connect to it. We will use iSCSI for that. Click on the Services button, scroll at the bottom of the list and enable iSCSI. After doing this, click on the little monkey wrench icon close to it to define the connection parameters.

There are several options in the tab, like extents, associated targets and so on. It's a pity that there is no wizard, you will need to configure them one by one.
The first one that needs to be configured is Portals. This will tell Freenas on which IP it should listen for incoming connections. You will need to create a rule like the one in this picture with the IP of the Freenas server and the port on which to listen, which by default is TCP 3260. Click Add Portal to create the rule

Next you will need to define who can connect to the volumes you created earlier. To do so, click on the Authorized Initiator button and create a rule with these parameters
-
Initiators: ALL
-
Authorized Network: 10.1.1.0/24 or whatever your cluster internal network is

Now that we defined who can connect, we need to define what they can connect to. Click on the Targets button and create two rules, one for each of the disks. The parameters to use in the first rule will be
- Target Name: quorum
- Target Alias: quorum
- Type: Disk
- Portal Group ID: 1
- Initiator Group ID: 1

Now that we created targets, we need to map them to some disks. To do so, click on Extents and create two rules:
- Extent Name: extent0
- Path to the extent: /mnt/quorum/quorum
- Extent size: 1GB
- Extent Name: extent1
- Path to the extent: /mnt/storage/storage
- Extent size: 7GB


Now we need to map Targets and Extents. Click on Associated Targets and create two rules that do exactly this:

That's it, we are done on Freenas. No need to save or whatever. Disks are ready to be accessed remotely from cluster members.
Head for your cluster members and connect via iSCSI to the remote drives. See part 3 on how to do it
Nessun commento:
Posta un commento